How I Make Basic Sourdough Bread.
- May 14, 2020
- 14 min read
Updated: Sep 16, 2020
There are a lot of different ways to make a great loaf of sourdough bread. This is a breakdown of my favourite techniques. If you are just looking for the formula/baking schedule, head to the recipe section of the website or click HERE for my post on the same loaf. What follows is an in-depth look at the process...It's kind of long, but it should give you a good grasp on how to produce a great loaf of sourdough bread at home.


This recipe will make two beautiful loaves of crusty artisan style bread like the ones you've been seeing all over the internet or at your local farmers' market. The bread will be 75% white flour and 25% whole wheat (use any whole wheat you would like). I find these percentages to be my sweet spot for a loaf that is easy to work with but also has some nice flavour rather than something made with more white flour. Baking bread with your starter can be a little tricky at first, but after a couple of tries you should start to get a feel for it. I will try to cover all of the essentials in this section. This technique is very flexible and can be adapted to every loaf I have posted in the recipe section of the website. There are a few different steps in the process and I will break each one down individually. Feel free to divide everything in half if you just want to bake a single loaf of bread.
Before we get into more detail, it will help to have a grasp of the Bakers Percentage. When using this, the main thing to remember is that everything is related back to the weight of the flour being used in your recipe. This is pretty universal in the bread world but there are a couple slight differences depending on who you talk to. The way I like to do it does not include the flour or water in the Levain. I'll use this bake as our example; we'll be using 800g of flour, 624g of water, 160g of Starter, and 16g of salt.
Flour- 800g divided by 800g multiplied by 100 = 100%. But this can get broken down further since we're using 600g of white flour and 200g of whole wheat. 600g divided by 800g X 100 = 75% white flour. 200g divided by 800g X 100 = 25% whole wheat.
Water- 624g divided by 800g multiplied by 100 = 78%
Starter- 160g divided by 800g multiplied by 100 = 20%
Salt- 16g divided by 800g multiplied by 100 = 2%
So... This bread has a Hydration level of 78%, the inoculation level (amount of starter) is 20% and the salt level is 2%


Now that you've got your head wrapped around that, you'll need to gather a few items before you can bake. All of these items can be found in the tools section of the website.
Starter also know as the "Levain" (see below) -160g
Flour -600g White Bread flour or All-Purpose (or a mix of the two) 200g Whole wheat. I used Red Fife Wheat but this can be standard whole wheat or you can use different varieties like Spelt, Kamut, Emmer, etc
Water -624g
Fine Salt -16g
Kitchen scale
A large mixing bowl
Spatula
Bench knife/scraper
Bannetons or a bowl/colander with a tea towel
Cast iron vessel with a lid
Oven Mitts
Razor blades
Proofer (totally optional...but worth it)
Digital thermometer
Rice Flour
Here are the basic steps, I'll go into more detail on each one below.
Levain Build- Mixing up a batch of starter that will be used to bake with
Autolyse- Mixing the flour, most of your water, and then letting it sit
Adding the Levain- Levain gets mixed into the dough
Adding the salt- Salt gets mixed in with a bit more water
Stretching/folding the dough- Usually 4-6 times throughout the process
Shaping- Creating a bit of structure and tension to help control the rise when baked
Cold proof (optional)- The dough goes into the fridge to stop the fermentation
Scoring & Baking- Baked at 450°F for a total of 40-50mins
Warm and consistent temperatures will make a huge difference in your results. I aim for my dough to be around 78°F or 25.5°C. If you are a few degrees under or over that's totally fine. Find a warm spot in your home (oven that's turned off with the light on, or a dough proofer), keep your dough covered as much as possible, check temperatures throughout the process and make adjustments as needed for your next bake.
Levain Build- 8:00am
As I mentioned above, the Starter and the Levain are kind of the same thing. Levain is a French word for some Starter that gets mixed up specifically for the bake that you're about to do. People like to do this so that they can cater to each particular loaf if they want (ex. if you're doing a sweet bread or a full white bread you might want to feed you Levain with only white flour in order to compliment the flavours). With that said, I find that my mix of 75% White and 25% Rye for my starter works for almost all of my breads, so for simplicity I rarely ever change that for my Levain build. Feel free to play around with different ratios and find what you like.
There are a couple options for Levain build timelines.
Same day Levain build- I like this method because it gives me a few hours in the morning to get out of the house and do some running around before getting started on the bread. It means that the bread isn't ready to get shaped until the evening, but since I usually put the dough in the fridge overnight so that I can bake it the next morning and have fresh bread for breakfast, I don't really mind. I would mix the same 25g of Starter, 75g flour, and 75g of WARM water at around 8am. Instead of leaving it somewhere cool I'd be looking for somewhere quite warm for it to sit. This can be anywhere that's around 24-26 degrees celsius (76-80°F). You can use your oven (TURNED OFF) with the interior light on or as I've mentioned before in a Proofer.
Overnight Levain build- I generally mix this up right before bed and then it's ready to go first thing in the morning. This is pretty convenient because it means you get straight to making bread in the morning and loaf is shaped or ready to bake by mid afternoon. I would mix 25g of Starter, 75g flour, and 75g of COLD water at about 10pm and leave it out on my cool kitchen counter. This allows it to at least double in size and is ready to add into my bread 10-12hrs later. For simplicity I'll be referring to the "Same day" levain build, but if you do want to do the overnight method just adapt the times.
These are just guidelines. Play around with whatever works for you. All you need to remember it that you want to use your Levain when it is at its peak! It can be just before or just after but try and use it when it's as tall and bubbly as possible.
Remember: there are a few different ways to control the speed of fermentation when it comes to your Starter/Levain and dough.
Inoculation level- Low inoculation means less old starter going into a feeding= slower fermentation. High inoculation= Faster fermentation
The warmer your environment the faster your fermentation will be
Cool water will slow it down, warm water will speed it up
Whole wheat flours speed up fermentation
Autolyse- 12:00pm

This step is pretty straightforward. All you're doing here is mixing your 800g of flour with 600g of warm water (~90°F/32°C). You want to save the last 24g of the water to add in later with the salt. You aren't trying to develop any gluten at this point so you don't want to mix it too much, just enough so that there is no dry flour left in the bowl. Once mixed, cover the bowl with a damp towel or plastic bag and place it somewhere warm in your house for 30 minutes or up to 2hrs. By letting the dough rest and hydrate you're helping to kickstart the gluten development. By the end of the Autolyse your dough will already feel smoother and more elastic.
Adding the Levain- 1:00pm
By this point your Levain should have doubled in size (or more) and be very bubbly. One test that you can use to see if it is ready is called the float test. All you do for this is gently scoop out a little bit of the Levain and plop it in a bowl of lukewarm water. If it floats it is good to go. This really isn't an exact science and I rarely do it , but it's a neat way to visualize how much gas is actually in your starter.
With your bowl on the scale add 160g of Levain onto the dough. Squeeze and mix for a couple minutes until everything comes together. Use a "scooping" motion to bring everything together (this is called the "Rubaud method"). When you start mixing you'll be able to feel a texture difference but soon they will blend nicely into each other. Be careful not to "tear" the dough. From this point forward, you want to keep everything intact as much as possible. Once everything is incorporated, clean up the sides of the bowl with a spatula, cover and put back in a warm place. This marks the beginning of the "Bulk Fermentation".
Adding the salt- 1:30pm

With your bowl on the scale sprinkle 16g of fine salt on top, adding the remaining 24g of water as well. Use your fingers to help dissolve the salt and press it into the dough. After that, use the same scooping method that you used when mixing the Levain into the dough. Again, try not to tear the dough. Mix for a few minutes until fully incorporated. Clean up the sides of the bowl, cover it up and keep it warm.
Coil Folds- 2:00pm-5:00pm

This is where we really start to develop some structure and dough strength. I like to do between 4 & 6 folds in this stage of the process. There are two techniques that you can use for this. There is the classic "Stretch and Fold" and my preferred method, the "Coil Fold". We'll be using the Coil Fold for this, but feel free to use whichever you'd like. A Coil Fold is performed by tucking your hands underneath the middle of the dough and lifting straight up. As you do this you are going to let the front of the dough fold/swing underneath and the rest of the dough will settle on top of it. You will then spin the bowl 180 degrees and repeat this same procedure. Tuck your hands under the middle, lift up, fold the front underneath. Next spin the bowl 90 degrees and repeat; hands under the middle, lift up, fold the front underneath. Finally, spin the bowl 180 degrees one more time and repeat; hands under the middle, lift up, fold the front underneath. When you're doing these try and stretch the dough as much as possible without any tearing. All of that put together is one Coil Fold. Four directions, tucked into a nice little ball. The videos below will help you visualize this.
In the beginning the dough will feel a bit sloppy and loose, you might even need to scrape the sides a little bit to help it release. However, after each set of Coil Folds you will notice that the dough will become easier and easier to work with. Between each set of folds you will notice that the dough "relaxes" a bit and spreads out in the bowl. As you do more and more folds and the dough gets stonger you're going to have to wait a bit longer before doing your next folds. I typically do about 30 minutes between my first 3 or 4 fold and then 45-60 minutes between my last couple folds. This is by no means a crucial or exact science. If you mess up the timing a bit don't worry, as long as you do 4 to 6 folds with the dough you will be fine. By the end of this process you should start to see the dough gaining some volume and will appear physically inflated. At this point you will need to start handling the dough very gently. This is key in order to prevent any unnecessary de-gassing. Notice the difference in the appearance of the dough in the two videos below. After each set of folds don't forget to clean up the sides of the bowl, cover it, and put back somewhere warm.
This is what the dough should look like during the first Coil Fold
The dough should look something like this during the fifth Coil Fold
Dividing the dough and pre-shaping- 6:30pm

Deciding when your dough has had enough fermentation is one of the most important parts when it comes to achieving a loaf of bread with great texture, taste and appearance. Unfortunately, it is not very clear cut either. It is going to take some practice, and even seasoned bakers still don't nail it every single time. A general rule of thumb is that you want about a 50% rise in your dough, but even that varies due to a multitude of factors. Your dough should be very "jiggly", when you shake the bowl, moving like a bowl of Jello. Since you've developed quite a bit of dough strength earlier on it will be still be standing up tall in the bowl and the movement will be quite obvious.
Now it's time to "Pre-shape" the dough. It's a bit tricky to explain but the video below will help demonstrate what you're trying to do. First, dump the dough out onto a clean, un-floured countertop. It should slowly peel off the bottom of the bowl if you hold it upside down. Next, grab your Bench knife/scraper and cut the dough straight down the middle. Now, you will want to do this next part quickly and efficiently. With your bench knife and your other hand, drag/slide the two piles of dough into round balls in as few motions as possible. This involves working in a circular motion and carefully pulling the dough towards you. Once you get the hang of it you'll be able to create a very tight ball as you use the bench knife to drag the dough across the un-floured work surface. You will now let the dough rest there uncovered for 15-30 minutes. This is called the "Bench Rest".
Shaping- 6:50pm

After your 15-30 minute Bench Rest the dough will have flattened out a bit but it should still be sitting up fairly tall and have nice, thick, round edges. Depending on the shape of your Banneton and your Dutch Oven you will either shape your dough into a ball for a round loaf (known as a "Boule") or an oval...for an oval loaf (known as a "batard"). Below I have posted a photo of each technique. It is very important that you work very gently with the dough now that the Bulk Fermentation is nearing completion. At this point the dough is full of gas and you want to conserve as much as possible to get a nice airy loaf of bread.
Shaping a Batard- Lightly dust the top of the dough with flour. Using your bench knife carefully slide it underneath the dough ball and flip it over so that the flour is now on the underside. With floured hands, fold two of the sides in towards themselves. Now start at one end, carefully but firmly roll the dough up until its a nice little cylinder balanced on the countertop. If you want you can pinch the ends together gently to eliminate the coiled look. Let the dough rest there for a few minutes. Next, lightly dust the top of the dough with a mix of All-Purpose flour and Rice flour (50:50). This helps to prevent sicking in your Banneton and will help it release when you try to dump it out to bake. Carefully pick up the dough and place it upside down into your Banneton (flour side down, seam side up).
Shaping a Boule- Lightly dust the top of the dough with flour. Using your bench knife carefully slide it underneath the dough ball and flip it over so that the flour is now on the underside. With floured hands, fold two of the sides in towards the middle. Now fold the top and bottom in towards the middle as well. Carefully roll the dough over so that the seam side is on the bottom again. Now use your hands or the bench knife to drag/pull the ball across the counter while maintaining the circular shape (similar to the pre-shape). Let the dough rest there for a few minutes. Next, lightly dust the top of the dough with a mix of All-Purpose flour and Rice flour (50:50). This helps to prevent sicking in your Banneton and will help it release when you try to dump it out to bake. Carefully pick up the dough and place it upside down into your Banneton (flour side down, seam side up).
Cold Proof- 7:00pm-8:00am

Now that the dough is tucked nicely into the bannetons it's time to cover them up with a plastic bag and put them into the fridge. This is when your Bulk Fermentation ends. If, while you were shaping the loaves you noticed that the fermentation could have been pushed further, you can continue to leave the dough out on the counter in the banneton and wait a bit longer (you want it to be jiggly). They will continue to ferment for a little while in the fridge but within a short time they will cool down enough so that the fermentation will almost completely stop. You will notice some more rise by morning but it won't be too significant. I generally put them in the fridge for 10-18 hours but if need be they still bake up nicely after 2 days in there! The cold proof helps in a couple of different ways; it allows the flavour to develop a bit more, but also, cold dough is much easier to score. I find that I get a more consistent rise (know as "Oven Spring") when baked from cold.
Preparation and Preheating- 7:00am
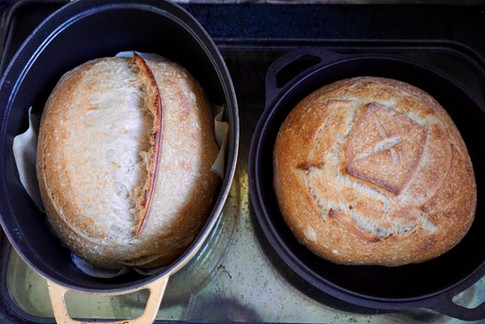
The next morning, an hour before I want to bake I put my cast iron dutch ovens and lids into the oven to preheat them as hot as I can. My home oven goes up to 550°F. While the oven is preheating I gather everything I need ready. Parchment paper, razor blades, oven mitts, wire rack. If you have a deep sided dutch oven this next step will be a little awkward but not too bad. If you have a shallow bottomed pan like a Lodge Combo Cooker/Dutch Oven or a Challenger Bread pan this next step will be significantly easier. You are going to want to place your cold dough into the extremely hot pan as carefully as you can. Once it's in, you will need to score the dough to help control the rise of the bread and to add an artistic touch to it... as you may have seen, people can get super artistic with it. I usually stick with a nice, clean, simple design. That is what we are going to do with these ones. One thing to keep in mind is that if you want a nice "Ear" it helps to slash the bread with a very shallow angle. Think of getting your blade at a 45° or less. I usually go about a 1/4" deep. It's nice to slash in one smooth clean motion... but if you need to go back and touch it up or go a little deeper it's not really a big deal either.
Scoring and Baking- 8:00am
Staub Cocotte- As you can see in the video I dump out the dough onto a piece of parchment paper and score the bread first before lowering down into the Pan. I find this to work best in order to get a nice clean score without burning yourself.
Lodge Dutch Oven- This pan is great because you can use it with the shallow side down, it gives you some working room and you can place your dough into the pan without burning yourself. Once it is in you can score it and put the lid on.
Challenger Bread Pan- These pans are great! They've been designed specifically for baking artisan style bread and the quality is top notch. These have a shallow base on them so it makes loading and unloading the dough very easy. I really like these because you can choose between a Boule or a Batard, whereas the other pans you are pretty much limited to one or the other. Click HERE to check them out! This was the Seeded Sourdough Loaf that you can find in the recipe section of the site or right HERE.
Regardless of how you do it, once the cold dough is in your smokin' hot pan you want to quickly put the lid on and then get it into the oven. I can fit two pans into my oven so I typically bake both loaves at the same time. Once you put the pans in it is very important that you turn the temperature down to 450°F. Now you're going to bake that for 20-22 minutes with the lid on the pan and then you're going to bake it for another 20 minutes with the lid off (maybe a bit more, maybe a bit less... Personally, I like a dark crusty loaf with a little burnt tip on the ear so I tend to go a bit longer). The reason you want the lid for the first half of the bake is that the steam from the loaf gets trapped inside the pot and helps prevent a crust from forming. You don't want a crust too soon or else that will limit the rise (oven spring) potential. After that first 20 minutes the bread has already risen as much as it can and the form is now set. By taking the lid off you'll release the remainder of the steam (watch your face!) and then the second half of the bake is what gives you that ridiculously crispy crust that is the trademark of any good artisan bread.


The Conclusion...Eating
Ideally a loaf of bread will actually stay fresh longer if you wait for it to fully cool down before cutting into it. The steam that comes out is moisture leaving the bread... But... Nothing really beats a fresh loaf of bread still warm from the oven!
After a few times this process will seem much more natural and the more you practice the better your loaves will turn out. Don not be discouraged if you get a few loaves that aren't as pretty as you would like, chances are they will still taste great! Let me know if you have any questions, I will do my best to help out where I can.
Your fermentation times may vary depending on a lot of different factors. Use these times for the folding and the duration of the Bulk Fermentation only as a guideline. What worked for me may need to be tweaked a little bit for your bake.