How To Make A Sourdough Starter
- May 14, 2020
- 5 min read
Updated: May 21, 2020
Here you'll find the ins and outs of creating and maintaining your own sourdough starter. Don't worry, it is not that hard.
Creating a sourdough starter is a pretty easy thing to accomplish. It Is quite forgiving and with a little bit of patience it will be active, bubbly and ready to bake within a matter of days! There are a lot of great books and resources that go very in-depth on the science of sourdough starters. However, you won't find that here. This is more about the basics and the maintenance of your sourdough culture. All you need to know for now is that a starter consists of natural yeasts and a couple of strains of lactic acid bacteria. It is fermented. It is healthy. If you are interested in learning more about the science of everything and want more of the nitty gritty details then check out some of the books on the Tools and Resources page. The "Sourdough School" By Vanessa Kimbell is a great place to dig into that.


You will need a few basic things before you get started.
A kitchen scale- most grocery stores sell them now.
A nice spatula. Don't get one of those cheap ones that has the rubber piece that pops off. You are going to use this thing A LOT!
A jar or container. Ideally, a glass jar with straight sides because you will want to be able to watch and monitor what's going on with your little science project. But realistically, you can use almost anything from a beer glass to an old yogurt container.
Flour for feeding your starter. I've experimented with a bunch of different flour blends. My preferred ratio seems to be a mix with 75% White/All-Purpose flour and 25% Dark Rye but a 50% All-purpose and 50% whole wheat works great as well. (Feeding hack- mix up a large container of your preferred blend so you just need to scoop out the weight you want and not have to measure different types of flour each time). Organic is great, but not essential.
Water. Tap water is generally fine for most people.
Creating a Starter

Day 1: Mix together 40g of blended flour mix and 40g of lukewarm water. Clean up the sides of the jar with your spatula and place a loose fitting lid on top. Let rest at room temperature on your counter for 24 hours (or an extra day if you want).
Day 2: You might start seeing some activity happening in your jar by this point, if not don't be discouraged. Discard 40g of the mixture and add in 20g of your preferred pre-mixed flour blend and 20g of lukewarm water (still 80g total in your jar). Clean up the sides with your spatula and place a loose fitting lid on top.
Day 3-5: Just keep repeating this same procedure at roughly the same time each day. Eventually you will start to see some major fermentation (bubbles and increase in size) happening. The photo above is my starter on day 5. It began at the blue line and over the course of the day it grew to 3 times its size.
Now that you have an established starter you just need to maintain it so that it is ready to go when you want to bake. These next steps refer to the maintenance of an established starter.
Maintaining your Starter

Once your starter is consistently rising (and falling) it's time to figure out how much and when to feed it. There are a few different feeding schedules you can use to maintain your starter. When you first get going I would recommend taking a week or so to dial in how much to feed your starter. Play around with different inoculation levels (meaning how much old starter to keep during each feeding). Below are the numbers I typically use. These may be different for you based on the flours you choose to use, the climate where you live and even elevation.
My preferred way to feed my starter is twice a day. In the morning I typically discard everything except for 5g of starter and then add 15g of water and 15g of flour (the same 75% white, 25% rye blend). In the evening this mixture has reached it peak and I repeat the same procedure. This works well for me because it means on any given day I can make up enough starter for a double batch of bread. I find that a starter that gets fed often tends to produce the best results, and it can reduce how "sour" your bread tastes.
You can also just feed it once a day if you would like. If that's the case, you can use a smaller ratio of starter to water/flour (example: 5g starter, 30g flour and 30g water). With a smaller proportion of starter your mix will ferment slower, extending the time between feeds.
If you will only be baking once a week or less, you can put your starter in the fridge. When doing this I usually do my discard and then feed it (5g starter, 15g flour, 15g water). Once fed I am able to leave it in the fridge for weeks...even months. A day before you want to bake pull it out of the fridge in the morning and let it rise throughout the day. That evening feed it again and then the next morning it should be good to go. If it has been in the fridge a long time, try to give it another day of feeding to get it back on track. The starter will last a long time in the fridge, so even if you have neglected it for months don't get discouraged! It will form a bit of gross looking liquid on top, called "hooch". Don’t worry, just pour it off and continue as normal. I did an experiment where I kept an old jar of starter in the fridge for 7 months. At the end of that period, I fed it one time and it still doubled on the first day! Sourdough starters are incredibly resilient.


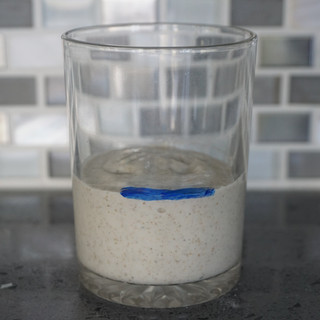


One thing to keep in mind with sourdough starters is that the best time to use it is when it is at its "peak". This means that it is risen to its maximum potential. After you have been doing it a little while it will make more sense and it will become intuitive. While it's rising it will have a "domed" top and will be higher in the middle than at the edges. As it approaches the peak this will become less distinguishable and at the peak it will be completely flat on top . It will then rest there, sometimes even for a couple hours, before collapsing upon itself (the photo above is just before it collapsed) . As it deflates, you will be able to see on the sides of the jar where the high point was and that will be a good indication of how far past the peak it has gone. The mix will also become much more viscous and obviously less aerated.
There are a few different way to control the speed of fermentation when it comes to your starter and later on your breads.
Inoculation level- Low inoculation means less old starter going into a feeding= slower fermentation. High inoculation= Faster fermentation
The warmer your environment the faster it will peak before collapsing
Cool water will slow it down, warm water will speed it up
Whole wheat flours speed up fermentation

Comments